
Quay trở lại sau quãng thời gian dài ăn hại và viết một bài comeback này, haha. Lý do quá lười bài viết có sự hỗ trợ của anh bạn thông minh ChatGPT.
Bài hướng dẫn dùng ansible run playbook mà không cần biết public IP cũng như ssh keypair bởi vì chúng ta sẽ dùng aws_ec2 plugin để lấy inventory dynamic và dùng aws_community plugin để connect instance sử dụng SSM session.
Bài viết giả định bạn đã cài ansible ở local machine cũng như các ec2 instance đã có role `AmazonSSMManagedInstanceCore`.
Bonus: Thêm một típ cho mọi người nếu muốn SSH mà không cần bận tâm public IP cũng như ssh key mà chỉ cần biết instance-id thôi thì làm như sau
Bước 1: Cài đặt AWS EC2 Instance Connect CLI
Để cài đặt AWS EC2 Instance Connect CLI, làm theo các bước sau:
- Mở terminal hoặc command prompt.
- Chạy lệnh sau để cài đặt gói phần mềm cần thiết:
pip install ec2instanceconnectcli
Bước 2: Cách sử dụng AWS EC2 Instance Connect CLI
Để sử dụng AWS EC2 Instance Connect CLI, làm theo các bước sau:
- Mở terminal hoặc command prompt.
- Đặt AWS profile bằng cách chạy lệnh sau:
export AWS_PROFILE=<YOUR_PROFILE>Thay
<YOUR_PROFILE>bằng tên AWS profile của bạn. - Chạy lệnh sau để kết nối đến instance EC2 bằng instance ID:
mssh i-aaaaaaaaaaaaaThay
i-aaaaaaaaaaaaabằng instance ID thực tế của instance EC2 mà bạn muốn kết nối.
Thế thôi, giờ quay trở lại vấn đề chính của bài viết.
Bước 1: Cài đặt plugin Ansible
Để cài đặt plugin Ansible và các module cần thiết, làm theo các bước sau:
- Đảm bảo rằng bạn đã cài đặt Python, phiên bản 3.6 trở lên.
- Cài đặt module
boto3bằng cách chạy lệnh sau:pip install boto3>=1.22.0
- Cài đặt module
botocorebằng cách chạy lệnh sau:pip install botocore>=1.25.0
- Cài đặt
amazon.awscho EC2 inventory hosts bằng lệnh sau:ansible-galaxy collection install amazon.aws
- Cài đặt
community.awscho plugin kết nối AWS SSM Session bằng lệnh sau:ansible-galaxy collection install community.aws
Bước 2: Tạo file plugin dynamic cho EC2 inventory
Để tạo file plugin dynamic cho EC2 inventory, làm theo các bước sau:
- Tạo một file mới có tên
aws_ec2.yamltrong thư mụcdemo-ansible. - Thêm nội dung sau vào file
aws_ec2.yaml:--- # aws ec2 ansible dynamic inventory plugin plugin: aws_ec2 boto_profile: etest regions: - eu-west-1 - us-west-2 # - us-east-2 # set strict to False # if True this will make invalid entries # a fatal error strict: False filters: tag:AppManagerCFNStackKey: internal-portal keyed_groups: # each aws ec2 instance has it own instance tags. create # a tag variable from those tags for ansible to use. # if an EC2 tag:Name is acloudguru_machine, it'll be converted to the # Ansible tag variable name as follows: tag_Name_acloudguru_machine # which can then be passed as a variable value for the host via -e flag - key: tags prefix: tag # # the following keyed groups are from the aws url: # https://docs.aws.amazon.com/cli/latest/reference/ec2/describe-instances.html#options # below are some of the variable that can be used. # an example for instance_type: # aws_instance_type_t2_micro - key: architecture prefix: arch - key: tags.Applications separator: '' - key: instance_type prefix: aws_instance_type - key: placement.region prefix: aws_region - key: image_id prefix: aws_image - key: hypervisor prefix: aws_hypervisor - key: 'security_groups|json_query("[].group_id")' prefix: 'security_groups' hostnames: # a list in order of precedence for hostname variables. # #- ip-address #- dns-name #- tag:Name - instance-idChú ý các params sau:
plugin: aws_ec2
boto_profile: TÊN_AWS_PROFILE_CỦA_BẠN
regions: VÙNG_AWS_CỦA_BẠN
filters:

tag:AppManagerCFNStackKey: internal-portal
hostnames:
- instance-id
Thay
TÊN_AWS_PROFILE_CỦA_BẠNbằng tên AWS profile của bạn vàVÙNG_AWS_CỦA_BẠNbằng vùng AWS mong muốn.
Bước 3: Tạo file cấu hình ansible.cfg
Để tạo file cấu hình ansible.cfg, làm theo các bước sau:
- Mở trình soạn thảo văn bản.
- Tạo một file mới có tên
ansible.cfgtrong thư mụcdemo-ansible. - Thêm nội dung sau vào file
ansible.cfg:# Example config file for ansible -- https://ansible.com/ # ======================================================= # Nearly all parameters can be overridden in ansible-playbook # or with command line flags. Ansible will read ANSIBLE_CONFIG, # ansible.cfg in the current working directory, .ansible.cfg in # the home directory, or /etc/ansible/ansible.cfg, whichever it # finds first # For a full list of available options, run ansible-config list or see the # documentation: https://docs.ansible.com/ansible/latest/reference_appendices/config.html. [defaults] inventory = ./aws_ec2.yml enable_plugins = aws_ec2 interpreter_python = auto_silent #interpreter_python = /usr/bin/python3 #library = ~/.ansible/plugins/modules:/usr/share/ansible/plugins/modules #module_utils = ~/.ansible/plugins/module_utils:/usr/share/ansible/plugins/module_utils remote_tmp = /tmp/.ansible/tmp #local_tmp = ~/.ansible/tmp #forks = 5 #poll_interval = 0.001 #ask_pass = False #transport = smart # Plays will gather facts by default, which contain information about # the remote system. # # smart - gather by default, but don't regather if already gathered # implicit - gather by default, turn off with gather_facts: False # explicit - do not gather by default, must say gather_facts: True #gathering = implicit # This only affects the gathering done by a play's gather_facts directive, # by default gathering retrieves all facts subsets # all - gather all subsets # network - gather min and network facts # hardware - gather hardware facts (longest facts to retrieve) # virtual - gather min and virtual facts # facter - import facts from facter # ohai - import facts from ohai # You can combine them using comma (ex: network,virtual) # You can negate them using ! (ex: !hardware,!facter,!ohai) # A minimal set of facts is always gathered. # #gather_subset = all # some hardware related facts are collected # with a maximum timeout of 10 seconds. This # option lets you increase or decrease that # timeout to something more suitable for the # environment. # #gather_timeout = 10 # Ansible facts are available inside the ansible_facts.* dictionary # namespace. This setting maintains the behaviour which was the default prior # to 2.5, duplicating these variables into the main namespace, each with a # prefix of 'ansible_'. # This variable is set to True by default for backwards compatibility. It # will be changed to a default of 'False' in a future release. # #inject_facts_as_vars = True # Paths to search for collections, colon separated # collections_paths = ~/.ansible/collections:/usr/share/ansible/collections # Paths to search for roles, colon separated #roles_path = ~/.ansible/roles:/usr/share/ansible/roles:/etc/ansible/roles # Host key checking is enabled by default host_key_checking = False # You can only have one 'stdout' callback type enabled at a time. The default # is 'default'. The 'yaml' or 'debug' stdout callback plugins are easier to read. # #stdout_callback = default #stdout_callback = yaml #stdout_callback = debug # Ansible ships with some plugins that require whitelisting, # this is done to avoid running all of a type by default. # These setting lists those that you want enabled for your system. # Custom plugins should not need this unless plugin author disables them # by default. # # Enable callback plugins, they can output to stdout but cannot be 'stdout' type. #callback_whitelist = timer, mail # Determine whether includes in tasks and handlers are "static" by # default. As of 2.0, includes are dynamic by default. Setting these # values to True will make includes behave more like they did in the # 1.x versions. # #task_includes_static = False #handler_includes_static = False # Controls if a missing handler for a notification event is an error or a warning #error_on_missing_handler = True # Default timeout for connection plugins #timeout = 10 # Default user to use for playbooks if user is not specified # Uses the connection plugin's default, normally the user currently executing Ansible, # unless a different user is specified here. # #remote_user = root # Logging is off by default unless this path is defined. #log_path = /var/log/ansible.log # Default module to use when running ad-hoc commands #module_name = command # Use this shell for commands executed under sudo. # you may need to change this to /bin/bash in rare instances # if sudo is constrained. # #executable = /bin/sh # By default, variables from roles will be visible in the global variable # scope. To prevent this, set the following option to True, and only # tasks and handlers within the role will see the variables there # #private_role_vars = False # List any Jinja2 extensions to enable here. #jinja2_extensions = jinja2.ext.do,jinja2.ext.i18n # If set, always use this private key file for authentication, same as # if passing --private-key to ansible or ansible-playbook # #private_key_file = /path/to/file # If set, configures the path to the Vault password file as an alternative to # specifying --vault-password-file on the command line. This can also be # an executable script that returns the vault password to stdout. # #vault_password_file = /path/to/vault_password_file # Format of string {{ ansible_managed }} available within Jinja2 # templates indicates to users editing templates files will be replaced. # replacing {file}, {host} and {uid} and strftime codes with proper values. # #ansible_managed = Ansible managed: {file} modified on %Y-%m-%d %H:%M:%S by {uid} on {host} # {file}, {host}, {uid}, and the timestamp can all interfere with idempotence # in some situations so the default is a static string: # #ansible_managed = Ansible managed # By default, ansible-playbook will display "Skipping [host]" if it determines a task # should not be run on a host. Set this to "False" if you don't want to see these "Skipping" # messages. NOTE: the task header will still be shown regardless of whether or not the # task is skipped. # #display_skipped_hosts = True # By default, if a task in a playbook does not include a name: field then # ansible-playbook will construct a header that includes the task's action but # not the task's args. This is a security feature because ansible cannot know # if the *module* considers an argument to be no_log at the time that the # header is printed. If your environment doesn't have a problem securing # stdout from ansible-playbook (or you have manually specified no_log in your # playbook on all of the tasks where you have secret information) then you can # safely set this to True to get more informative messages. # #display_args_to_stdout = False # Ansible will raise errors when attempting to dereference # Jinja2 variables that are not set in templates or action lines. Uncomment this line # to change this behavior. # #error_on_undefined_vars = False # Ansible may display warnings based on the configuration of the # system running ansible itself. This may include warnings about 3rd party packages or # other conditions that should be resolved if possible. # To disable these warnings, set the following value to False: # system_warnings = False # Ansible may display deprecation warnings for language # features that should no longer be used and will be removed in future versions. # To disable these warnings, set the following value to False: # deprecation_warnings = False # Ansible can optionally warn when usage of the shell and # command module appear to be simplified by using a default Ansible module # instead. These warnings can be silenced by adjusting the following # setting or adding warn=yes or warn=no to the end of the command line # parameter string. This will for example suggest using the git module # instead of shelling out to the git command. # command_warnings = False # set plugin path directories here, separate with colons #action_plugins = /usr/share/ansible/plugins/action #become_plugins = /usr/share/ansible/plugins/become #cache_plugins = /usr/share/ansible/plugins/cache #callback_plugins = /usr/share/ansible/plugins/callback #connection_plugins = /usr/share/ansible/plugins/connection #lookup_plugins = /usr/share/ansible/plugins/lookup #inventory_plugins = /usr/share/ansible/plugins/inventory #vars_plugins = /usr/share/ansible/plugins/vars #filter_plugins = /usr/share/ansible/plugins/filter #test_plugins = /usr/share/ansible/plugins/test #terminal_plugins = /usr/share/ansible/plugins/terminal #strategy_plugins = /usr/share/ansible/plugins/strategy # Ansible will use the 'linear' strategy but you may want to try another one. #strategy = linear # By default, callbacks are not loaded for /bin/ansible. Enable this if you # want, for example, a notification or logging callback to also apply to # /bin/ansible runs # #bin_ansible_callbacks = False # Don't like cows? that's unfortunate. # set to 1 if you don't want cowsay support or export ANSIBLE_NOCOWS=1 #nocows = 1 # Set which cowsay stencil you'd like to use by default. When set to 'random', # a random stencil will be selected for each task. The selection will be filtered # against the `cow_whitelist` option below. # #cow_selection = default #cow_selection = random # When using the 'random' option for cowsay, stencils will be restricted to this list. # it should be formatted as a comma-separated list with no spaces between names. # NOTE: line continuations here are for formatting purposes only, as the INI parser # in python does not support them. # #cow_whitelist=bud-frogs,bunny,cheese,daemon,default,dragon,elephant-in-snake,elephant,eyes,\ # hellokitty,kitty,luke-koala,meow,milk,moofasa,moose,ren,sheep,small,stegosaurus,\ # stimpy,supermilker,three-eyes,turkey,turtle,tux,udder,vader-koala,vader,www # Don't like colors either? # set to 1 if you don't want colors, or export ANSIBLE_NOCOLOR=1 # #nocolor = 1 # If set to a persistent type (not 'memory', for example 'redis') fact values # from previous runs in Ansible will be stored. This may be useful when # wanting to use, for example, IP information from one group of servers # without having to talk to them in the same playbook run to get their # current IP information. # #fact_caching = memory # This option tells Ansible where to cache facts. The value is plugin dependent. # For the jsonfile plugin, it should be a path to a local directory. # For the redis plugin, the value is a host:port:database triplet: fact_caching_connection = localhost:6379:0 # #fact_caching_connection=/tmp # retry files # When a playbook fails a .retry file can be created that will be placed in ~/ # You can enable this feature by setting retry_files_enabled to True # and you can change the location of the files by setting retry_files_save_path # #retry_files_enabled = False #retry_files_save_path = ~/.ansible-retry # prevents logging of task data, off by default #no_log = False # prevents logging of tasks, but only on the targets, data is still logged on the master/controller #no_target_syslog = False # Controls whether Ansible will raise an error or warning if a task has no # choice but to create world readable temporary files to execute a module on # the remote machine. This option is False by default for security. Users may # turn this on to have behaviour more like Ansible prior to 2.1.x. See # https://docs.ansible.com/ansible/latest/user_guide/become.html#becoming-an-unprivileged-user # for more secure ways to fix this than enabling this option. # #allow_world_readable_tmpfiles = False # Controls what compression method is used for new-style ansible modules when # they are sent to the remote system. The compression types depend on having # support compiled into both the controller's python and the client's python. # The names should match with the python Zipfile compression types: # * ZIP_STORED (no compression. available everywhere) # * ZIP_DEFLATED (uses zlib, the default) # These values may be set per host via the ansible_module_compression inventory variable. # #module_compression = 'ZIP_DEFLATED' # This controls the cutoff point (in bytes) on --diff for files # set to 0 for unlimited (RAM may suffer!). # #max_diff_size = 104448 # Controls showing custom stats at the end, off by default #show_custom_stats = False # Controls which files to ignore when using a directory as inventory with # possibly multiple sources (both static and dynamic) # #inventory_ignore_extensions = ~, .orig, .bak, .ini, .cfg, .retry, .pyc, .pyo # This family of modules use an alternative execution path optimized for network appliances # only update this setting if you know how this works, otherwise it can break module execution # #network_group_modules=eos, nxos, ios, iosxr, junos, vyos # When enabled, this option allows lookups (via variables like {{lookup('foo')}} or when used as # a loop with `with_foo`) to return data that is not marked "unsafe". This means the data may contain # jinja2 templating language which will be run through the templating engine. # ENABLING THIS COULD BE A SECURITY RISK # #allow_unsafe_lookups = False # set default errors for all plays #any_errors_fatal = False [inventory] # List of enabled inventory plugins and the order in which they are used. #enable_plugins = host_list, script, auto, yaml, ini, toml # Ignore these extensions when parsing a directory as inventory source #ignore_extensions = .pyc, .pyo, .swp, .bak, ~, .rpm, .md, .txt, ~, .orig, .ini, .cfg, .retry # ignore files matching these patterns when parsing a directory as inventory source #ignore_patterns= # If 'True' unparsed inventory sources become fatal errors, otherwise they are warnings. #unparsed_is_failed = False [privilege_escalation] #become = False #become_method = sudo #become_ask_pass = False ## Connection Plugins ## # Settings for each connection plugin go under a section titled '[[plugin_name]_connection]' # To view available connection plugins, run ansible-doc -t connection -l # To view available options for a connection plugin, run ansible-doc -t connection [plugin_name] # https://docs.ansible.com/ansible/latest/plugins/connection.html [paramiko_connection] # uncomment this line to cause the paramiko connection plugin to not record new host # keys encountered. Increases performance on new host additions. Setting works independently of the # host key checking setting above. #record_host_keys=False # by default, Ansible requests a pseudo-terminal for commands executed under sudo. Uncomment this # line to disable this behaviour. #pty = False # paramiko will default to looking for SSH keys initially when trying to # authenticate to remote devices. This is a problem for some network devices # that close the connection after a key failure. Uncomment this line to # disable the Paramiko look for keys function #look_for_keys = False # When using persistent connections with Paramiko, the connection runs in a # background process. If the host doesn't already have a valid SSH key, by # default Ansible will prompt to add the host key. This will cause connections # running in background processes to fail. Uncomment this line to have # Paramiko automatically add host keys. #host_key_auto_add = True [ssh_connection] # ssh arguments to use # Leaving off ControlPersist will result in poor performance, so use # paramiko on older platforms rather than removing it, -C controls compression use #ssh_args = -C -o ControlMaster=auto -o ControlPersist=60s # The base directory for the ControlPath sockets. # This is the "%(directory)s" in the control_path option # # Example: # control_path_dir = /tmp/.ansible/cp #control_path_dir = ~/.ansible/cp # The path to use for the ControlPath sockets. This defaults to a hashed string of the hostname, # port and username (empty string in the config). The hash mitigates a common problem users # found with long hostnames and the conventional %(directory)s/ansible-ssh-%%h-%%p-%%r format. # In those cases, a "too long for Unix domain socket" ssh error would occur. # # Example: # control_path = %(directory)s/%%C #control_path = # Enabling pipelining reduces the number of SSH operations required to # execute a module on the remote server. This can result in a significant # performance improvement when enabled, however when using "sudo:" you must # first disable 'requiretty' in /etc/sudoers # # By default, this option is disabled to preserve compatibility with # sudoers configurations that have requiretty (the default on many distros). # #pipelining = False # Control the mechanism for transferring files (old) # * smart = try sftp and then try scp [default] # * True = use scp only # * False = use sftp only #scp_if_ssh = smart # Control the mechanism for transferring files (new) # If set, this will override the scp_if_ssh option # * sftp = use sftp to transfer files # * scp = use scp to transfer files # * piped = use 'dd' over SSH to transfer files # * smart = try sftp, scp, and piped, in that order [default] #transfer_method = smart # If False, sftp will not use batch mode to transfer files. This may cause some # types of file transfer failures impossible to catch however, and should # only be disabled if your sftp version has problems with batch mode #sftp_batch_mode = False # The -tt argument is passed to ssh when pipelining is not enabled because sudo # requires a tty by default. #usetty = True # Number of times to retry an SSH connection to a host, in case of UNREACHABLE. # For each retry attempt, there is an exponential backoff, # so after the first attempt there is 1s wait, then 2s, 4s etc. up to 30s (max). #retries = 3 [persistent_connection] # Configures the persistent connection timeout value in seconds. This value is # how long the persistent connection will remain idle before it is destroyed. # If the connection doesn't receive a request before the timeout value # expires, the connection is shutdown. The default value is 30 seconds. #connect_timeout = 30 # The command timeout value defines the amount of time to wait for a command # or RPC call before timing out. The value for the command timeout must # be less than the value of the persistent connection idle timeout (connect_timeout) # The default value is 30 second. #command_timeout = 30 ## Become Plugins ## # Settings for become plugins go under a section named '[[plugin_name]_become_plugin]' # To view available become plugins, run ansible-doc -t become -l # To view available options for a specific plugin, run ansible-doc -t become [plugin_name] # https://docs.ansible.com/ansible/latest/plugins/become.html [sudo_become_plugin] #flags = -H -S -n #user = root [selinux] # file systems that require special treatment when dealing with security context # the default behaviour that copies the existing context or uses the user default # needs to be changed to use the file system dependent context. #special_context_filesystems=fuse,nfs,vboxsf,ramfs,9p,vfat # Set this to True to allow libvirt_lxc connections to work without SELinux. #libvirt_lxc_noseclabel = False [colors] #highlight = white #verbose = blue #warn = bright purple #error = red #debug = dark gray #deprecate = purple #skip = cyan #unreachable = red #ok = green #changed = yellow #diff_add = green #diff_remove = red #diff_lines = cyan [diff] # Always print diff when running ( same as always running with -D/--diff ) #always = False # Set how many context lines to show in diff #context = 3
Chúc ý param inventory = ./aws_ec2.yml cần khai báo đúng vị trí file dynamic inventory.
Bước 4: Tạo file playbook.yaml
Để tạo file playbook.yaml, làm theo các bước sau:
- Mở trình soạn thảo văn bản.
- Tạo một file mới có tên
playbook.yamltrong thư mụcdemo-ansible. - Thêm nội dung sau vào file
playbook.yaml:# playbook.yml - name: Example playbook hosts: all gather_facts: False vars: ansible_connection: aws_ssm ansible_aws_ssm_region: eu-west-1 ansible_aws_ssm_bucket_name: ansible-tritest tasks: - name: Ping the EC2 instances ping: - name: echo public IP shell: curl ipinfo.io/ip register: pubip - debug: var=pubip.stdoutCập nhật các biến
ansible_aws_ssm_regionvàansible_aws_ssm_bucket_nametheo nhu cầu của bạn. - Vì sao cần
ansible_aws_ssm_bucket_name? theo tài liệu thì phải sử dụng S3 cho file transfer lưu trữ.
Bước 5: Run playbook
Để chạy playbook và thực hiện kiểm tra ping trên các instance với tag đã chỉ định, làm theo các bước sau:
- Mở terminal hoặc command prompt.
- Đặt AWS profile bằng cách chạy lệnh sau:
export AWS_PROFILE=<YOUR_PROFILE>Thay
<YOUR_PROFILE>bằng tên AWS profile mong muốn. - Chạy lệnh sau để thực thi playbook:
ansible-playbook -i aws_ec2.yaml playbook.yaml -u ec2-user
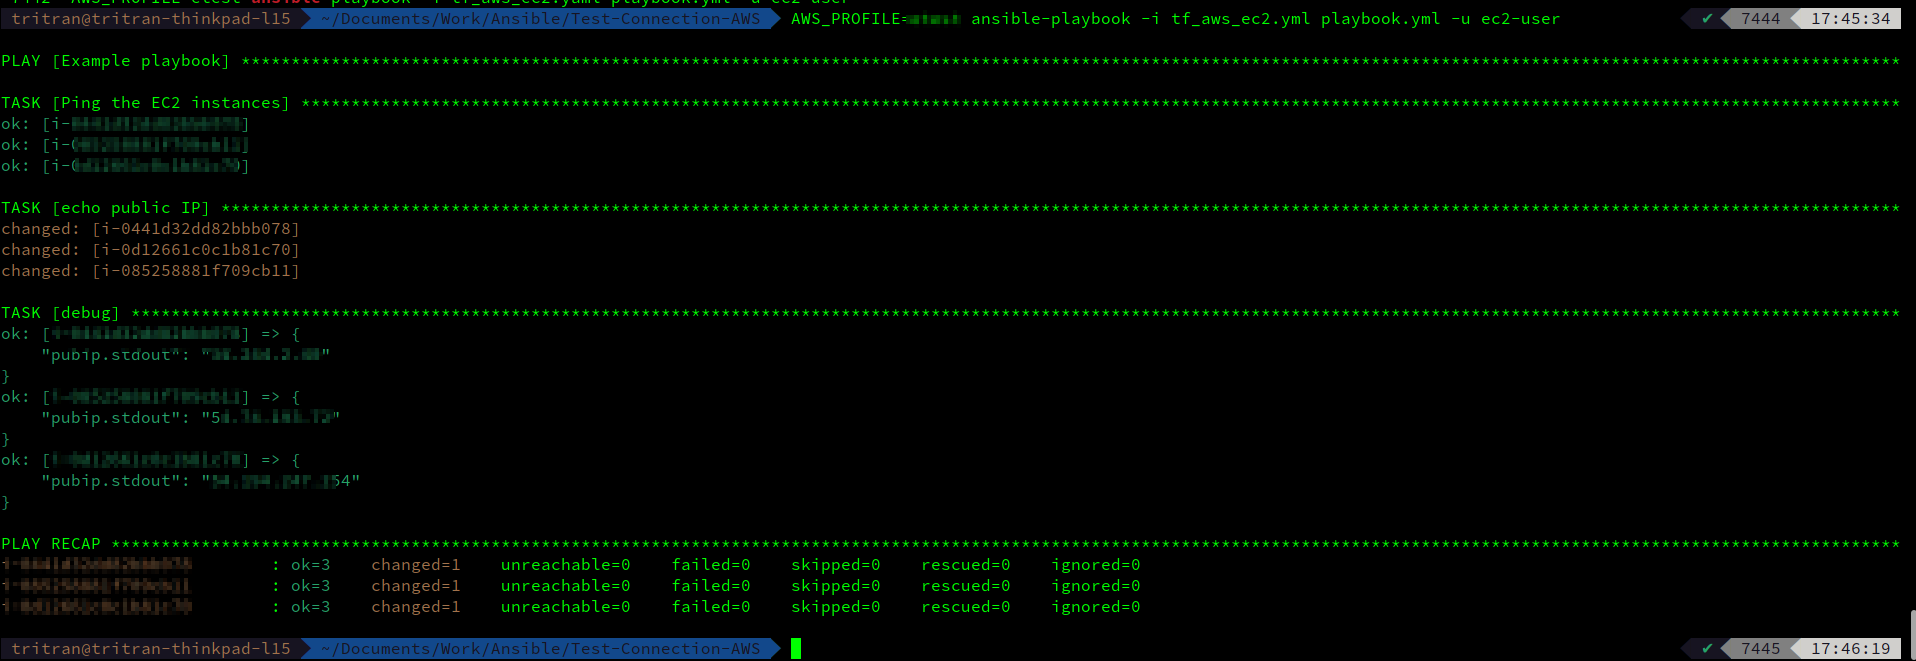
Đó là tất cả! Playbook sẽ chạy và kiểm tra ping trên tất cả các instance với tag “AppManagerCFNStackKey: internal-portal” và in ra địa chỉ IP công khai của chúng.