


![[AWS Certificate] Cùng nhau practice 01 – Share AMI cross account để sử dụng cho ASG](https://syslife.info/wp-content/uploads/2024/01/aws-practice01-0.png)


Xin chào mọi người … Lâu rồi không viết bài nào mới nên ngứa tay, hôm nay mình sẽ hướng dẫn mọi người monitor Disk usage, Memory usage, Disk I/O bằng cloudwatch-agent trên AWS và tạo trigger để alert cơ bản trên Slack, mọi người cùng theo dõi nhé.
I. Đôi nét
Mặc định Cloudwatch chỉ monitor vài thông số cơ bản như CPU, Network In/Out …
Nếu bạn muốn biêt tình trạng sức khỏe instance nhiều hơn như còn bao nhiêu disk space, memory sử dụng còn bao nhiêu … thì bạn phải sử dụng thêm cloudwatch-agent. Nếu bạn sử dụng OS do AWS phát triển thì cloudwatch-agent được cài mặc định, trong bài viết này mình sẽ hướng dẫn cài cloudwatch-agent trên Centos 7 luôn. Mình không đề cập đến vấn đề cost ở đây nha, sẽ có bài viết thêm về vấn đề này sau.
II. Tạo IAM role để sử dụng cloudwatch-agent trên EC2 và tạo user programmatic
Trên đây là 2 ý khác nhau nhen.
Mục đích tạo user programmatic là để sử dụng user này tải lên template config cloudwatch-agent vào parameter store. Nên tất nhiên bạn có thể optional việc tạo user này, nếu không muốn tải template lên. Khi tạo user này bạn hãy cấp quyền cho user ghi vào Parameter Store, kèm theo là quyền đọc thông tin từ instance và ghi vào cloudwatch.
- Để tạo user programmatic, bạn truy cập vào IAM (https://console.aws.amazon.com/iam/ )
- Chọn Users >> Add user
- Nhập vào tên user, ví dụ cloudwatch-agent
- Access type, Chọn Programmatic access, sau đó chọn Next: Permissions.
- Set permissions, Chọn Attach existing policies directly.
- Tại đây show ra list các policies, bạn check box CloudWatchAgentAdminPolicy và AmazonSSMManagedInstanceCore. Có thể dùng search box để tìm cho nhanh.
- Chọn Next: Tags.
- Chọn Next: Review.
- Chọn Create user.
- Khi tạo xong, trang sẽ điều hướng bạn tới trang người dùng mới, bạn hay download secrect key .csv về máy nhé, sẽ dùng tới nó.

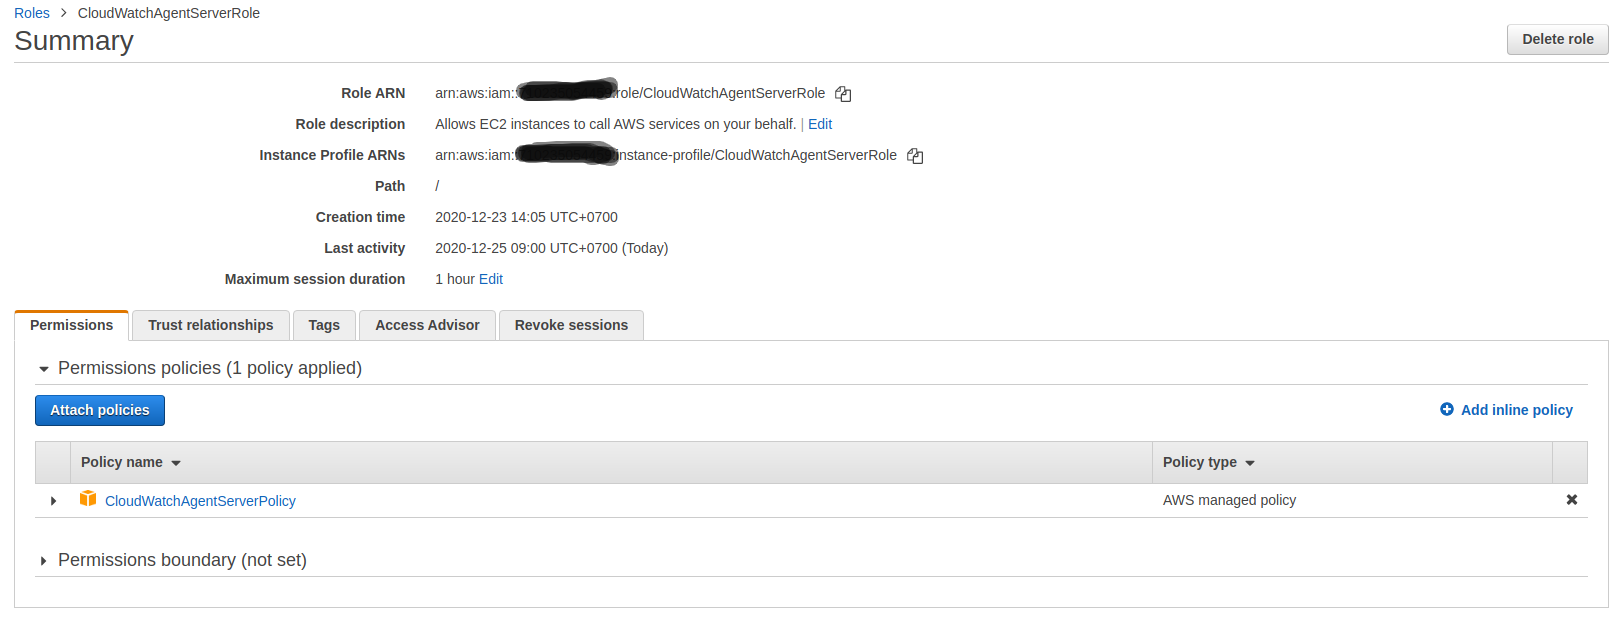
Tiếp đến, bạn tạo một role để gán vào instance, cho phép instance sử dụng cloudwatch-agent
- Tiếp tục ở giao diện IAM https://console.aws.amazon.com/iam/.
- Điều hướng đến Roles và chọn Create role.
- Trong Select type of trusted entity, chọn AWS service.
- Trong Common use cases, chọn EC2, sau đó chọn Next: Permissions.
- Trong list của policies, Bạn search CloudWatchAgentServerPolicy.
- Chọn Next: Tags.
- Phần Role name, bạn điền tên gợi nhớ chút, ví dụ như CloudWatchAgentServerRole.
- (Optional) phần Role description, điền vào mô tả ngắn gọn xúc tích.
- Xác nhận lại các thông tin và click vào Create role.
III. Install aws-cloudwatch-agent
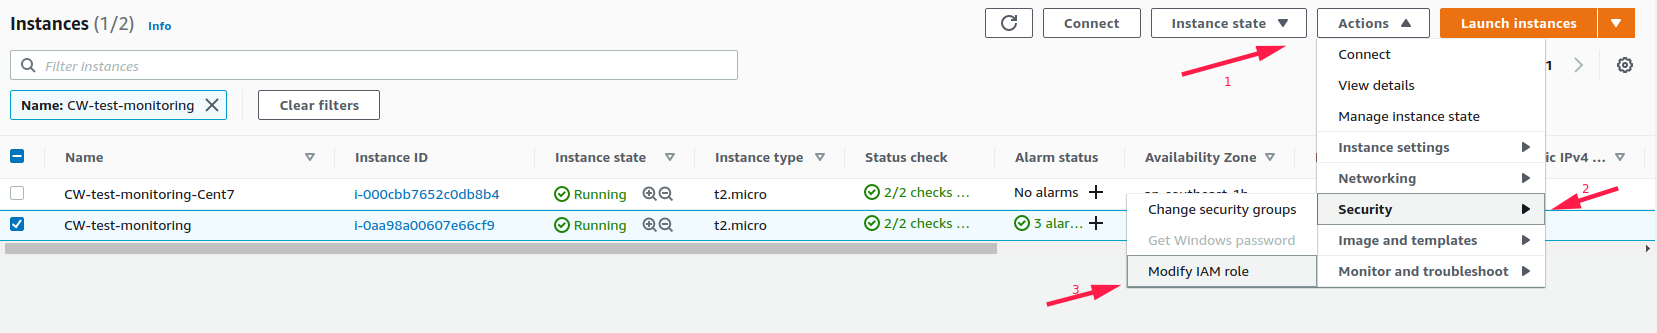
Giả sử rằng bạn đã tạo được 1 instance EC2, trước khi login vào instance, hay attach role vào instance này như phần trước mình đã tạo.
Trên AWS >> EC2 >> chọn instance >> instance setting >> Attach/Replace IAM role >> chọn role name vừa tạo khi nãy đó là CloudWatchAgentServerRole.
Bước tiếp theo là login vào instance, nếu bạn sử dụng OS EC2 Amazon Linux 2 mặc đinh do AWS customize thì bạn dùng lệnh sau để cài đặt:
sudo yum install amazon-cloudwatch-agent
Nhưng nếu bạn sử dụng OS khác như CentOS, Ubuntu … thì bạn cần phải cài đặt thủ công đấy nhé, trong phạm vi bài viết này mình chỉ hướng dẫn cài đặt cloudwatch-agent trên CentOS 7, với cái distro khác thì tương tự.
wget https://s3.amazonaws.com/amazoncloudwatch-agent/linux/amd64/latest/AmazonCloudWatchAgent.zip

unzip AmazonCloudWatchAgent.zip

./install.sh
Trên CentOS 7 cũng chưa có sẵn aws-cli, do đó nếu bạn muốn push hoặc pull template config cloudwatch-agent về thì cần phải cài đặt vào.
curl "https://awscli.amazonaws.com/awscli-exe-linux-x86_64.zip" -o "awscliv2.zip"

unzip awscliv2.zip

sudo ./aws/install

/usr/local/bin/aws --version

ln -s /usr/local/bin/aws /usr/bin/aws
Tiếp đến, trên cả 2 OS type bạn phải cài collected package
Với Centos 7:
yum -y install epel-release

yum -y install collectd
Với Amazon Linux 2:
sudo amazon-linux-extras install collectd
Xong bước prepare hết rồi, giờ khởi chạy wizard để Gen config cho cloudwatch-agent:
sudo /opt/aws/amazon-cloudwatch-agent/bin/amazon-cloudwatch-agent-config-wizard
| [root@ip-172-19-2-113 ~]# sudo /opt/aws/amazon-cloudwatch-agent/bin/amazon-cloudwatch-agent-config-wizard
============================================================= = Welcome to the AWS CloudWatch Agent Configuration Manager = ============================================================= On which OS are you planning to use the agent? 1. linux 2. windows default choice: [1]: Trying to fetch the default region based on ec2 metadata… Are you using EC2 or On-Premises hosts? 1. EC2 2. On-Premises default choice: [1]: Which user are you planning to run the agent? 1. root 2. cwagent 3. others default choice: [1]: 2 Do you want to turn on StatsD daemon? 1. yes 2. no default choice: [1]: Which port do you want StatsD daemon to listen to? default choice: [8125] What is the collect interval for StatsD daemon? 1. 10s 2. 30s 3. 60s default choice: [1]: What is the aggregation interval for metrics collected by StatsD daemon? 1. Do not aggregate 2. 10s 3. 30s 4. 60s default choice: [4]: Do you want to monitor metrics from CollectD? 1. yes 2. no default choice: [1]: Do you want to monitor any host metrics? e.g. CPU, memory, etc. 1. yes 2. no default choice: [1]: Do you want to monitor cpu metrics per core? Additional CloudWatch charges may apply. 1. yes 2. no default choice: [1]: 2 Do you want to add ec2 dimensions (ImageId, InstanceId, InstanceType, AutoScalingGroupName) into all of your metrics if the info is available? 1. yes 2. no default choice: [1]: Would you like to collect your metrics at high resolution (sub-minute resolution)? This enables sub-minute resolution for all metrics, but you can customize for specific metrics in the output json file. 1. 1s 2. 10s 3. 30s 4. 60s default choice: [4]: Which default metrics config do you want? 1. Basic 2. Standard 3. Advanced 4. None default choice: [1]: 3 =>> Phần này bạn phải chọn số 3 để cloudwatch collect thông tin về RAM, disk. Current config as follows: { “agent”: { “metrics_collection_interval”: 60, “run_as_user”: “cwagent” }, “metrics”: { “append_dimensions”: { “AutoScalingGroupName”: “${aws:AutoScalingGroupName}”, “ImageId”: “${aws:ImageId}”, “InstanceId”: “${aws:InstanceId}”, “InstanceType”: “${aws:InstanceType}” }, “metrics_collected”: { “collectd”: { “metrics_aggregation_interval”: 60 }, “cpu”: { “measurement”: [ “cpu_usage_idle”, “cpu_usage_iowait”, “cpu_usage_user”, “cpu_usage_system” ], “metrics_collection_interval”: 60, “totalcpu”: false }, “disk”: { “measurement”: [ “used_percent”, “inodes_free” ], “metrics_collection_interval”: 60, “resources”: [ “*” ] }, “diskio”: { “measurement”: [ “io_time”, “write_bytes”, “read_bytes”, “writes”, “reads” ], “metrics_collection_interval”: 60, “resources”: [ “*” ] }, “mem”: { “measurement”: [ “mem_used_percent” ], “metrics_collection_interval”: 60 }, “netstat”: { “measurement”: [ “tcp_established”, “tcp_time_wait” ], “metrics_collection_interval”: 60 }, “statsd”: { “metrics_aggregation_interval”: 60, “metrics_collection_interval”: 10, “service_address”: “:8125” }, “swap”: { “measurement”: [ “swap_used_percent” ], “metrics_collection_interval”: 60 } } } } Are you satisfied with the above config? Note: it can be manually customized after the wizard completes to add additional items. 1. yes 2. no default choice: [1]: Do you have any existing CloudWatch Log Agent (http://docs.aws.amazon.com/AmazonCloudWatch/latest/logs/AgentReference.html) configuration file to import for migration? 1. yes 2. no default choice: [2]: 2 Do you want to monitor any log files? 1. yes 2. no default choice: [1]: 2 =>> Phần này nếu bạn muốn monitor thêm file log nào thì chọn “yes” và list ra những file bạn muốn monitor, riêng mình không cần monitor log file nên bỏ qua. Saved config file to /opt/aws/amazon-cloudwatch-agent/bin/config.json successfully. Current config as follows: { “agent”: { “metrics_collection_interval”: 60, “run_as_user”: “cwagent” }, “metrics”: { “append_dimensions”: { “AutoScalingGroupName”: “${aws:AutoScalingGroupName}”, “ImageId”: “${aws:ImageId}”, “InstanceId”: “${aws:InstanceId}”, “InstanceType”: “${aws:InstanceType}” }, “metrics_collected”: { “collectd”: { “metrics_aggregation_interval”: 60 }, “cpu”: { “measurement”: [ “cpu_usage_idle”, “cpu_usage_iowait”, “cpu_usage_user”, “cpu_usage_system” ], “metrics_collection_interval”: 60, “totalcpu”: false }, “disk”: { “measurement”: [ “used_percent”, “inodes_free” ], “metrics_collection_interval”: 60, “resources”: [ “*” ] }, “diskio”: { “measurement”: [ “io_time”, “write_bytes”, “read_bytes”, “writes”, “reads” ], “metrics_collection_interval”: 60, “resources”: [ “*” ] }, “mem”: { “measurement”: [ “mem_used_percent” ], “metrics_collection_interval”: 60 }, “netstat”: { “measurement”: [ “tcp_established”, “tcp_time_wait” ], “metrics_collection_interval”: 60 }, “statsd”: { “metrics_aggregation_interval”: 60, “metrics_collection_interval”: 10, “service_address”: “:8125” }, “swap”: { “measurement”: [ “swap_used_percent” ], “metrics_collection_interval”: 60 } } } } Please check the above content of the config. The config file is also located at /opt/aws/amazon-cloudwatch-agent/bin/config.json. Edit it manually if needed. Do you want to store the config in the SSM parameter store? 1. yes 2. no default choice: [1]: 1 =>> Bước này chính là để push template config lên Parameter Store trên AWS, bạn cần đến IAM user đã tạo ở phần trước. What parameter store name do you want to use to store your config? (Use ‘AmazonCloudWatch-‘ prefix if you use our managed AWS policy) default choice: [AmazonCloudWatch-linux] =>> Cái này chính là đặt tên cho template, nhớ prefix là bắt đầu bởi “AmazonCloudWatch-” Trying to fetch the default region based on ec2 metadata… Which region do you want to store the config in the parameter store? default choice: [ap-southeast-1] =>> Nhớ chọn Region để tải lên template Which AWS credential should be used to send json config to parameter store? 1. ASIA2KXKO4F54Q2TC75Z(From SDK) 2. Other default choice: [1]: 1 =>> Phần này do mình đã config secrect key rồi nên mới chọn 1, nếu là lần đầu bạn upload thì chọn 2 và điền vào access key và Secret access key Please make sure the creds you used have the right permissions configured for SSM access. Which AWS credential should be used to send json config to parameter store? 1. ASIA2KXKO4F54Q2TC75Z(From SDK) 2. Other default choice: [1]: 1 Please make sure the creds you used have the right permissions configured for SSM access. Successfully put config to parameter store AmazonCloudWatch-linux. Program exits now. |
Quan sát lại trong Parameter Store xem template đã được push lên chưa

IV. Validation
Run command sau để update config và start cloudwatch-agent service
| /opt/aws/amazon-cloudwatch-agent/bin/amazon-cloudwatch-agent-ctl -a fetch-config -m ec2 -c file:/opt/aws/amazon-cloudwatch-agent/bin/config.json -s /opt/aws/amazon-cloudwatch-agent/bin/config-downloader –output-dir /opt/aws/amazon-cloudwatch-agent/etc/amazon-cloudwatch-agent.d –download-source file:/opt/aws/amazon-cloudwatch-agent/bin/config.json –mode ec2 –config /opt/aws/amazon-cloudwatch-agent/etc/common-config.toml –multi-config default |
Kết quả như bên dưới là đã thành công:
| [root@ip-172-19-2-113 ~]# /opt/aws/amazon-cloudwatch-agent/bin/amazon-cloudwatch-agent-ctl -a fetch-config -m ec2 -c file:/opt/aws/amazon-cloudwatch-agent/bin/config.json -s /opt/aws/amazon-cloudwatch-agent/bin/config-downloader –output-dir /opt/aws/amazon-cloudwatch-agent/etc/amazon-cloudwatch-agent.d –download-source file:/opt/aws/amazon-cloudwatch-agent/bin/config.json –mode ec2 –config /opt/aws/amazon-cloudwatch-agent/etc/common-config.toml –multi-config default
/opt/aws/amazon-cloudwatch-agent/bin/config-downloader –output-dir /opt/aws/amazon-cloudwatch-agent/etc/amazon-cloudwatch-agent.d –download-source file:/opt/aws/amazon-cloudwatch-agent/bin/config.json –mode ec2 –config /opt/aws/amazon-cloudwatch-agent/etc/common-config.toml –multi-config default Successfully fetched the config and saved in /opt/aws/amazon-cloudwatch-agent/etc/amazon-cloudwatch-agent.d/file_config.json.tmp Start configuration validation… /opt/aws/amazon-cloudwatch-agent/bin/config-translator –input /opt/aws/amazon-cloudwatch-agent/etc/amazon-cloudwatch-agent.json –input-dir /opt/aws/amazon-cloudwatch-agent/etc/amazon-cloudwatch-agent.d –output /opt/aws/amazon-cloudwatch-agent/etc/amazon-cloudwatch-agent.toml –mode ec2 –config /opt/aws/amazon-cloudwatch-agent/etc/common-config.toml –multi-config default 2020/12/24 04:06:40 Reading json config file path: /opt/aws/amazon-cloudwatch-agent/etc/amazon-cloudwatch-agent.d/file_config.json.tmp … Valid Json input schema. I! Detecting runasuser… No csm configuration found. No log configuration found. Configuration validation first phase succeeded /opt/aws/amazon-cloudwatch-agent/bin/amazon-cloudwatch-agent -schematest -config /opt/aws/amazon-cloudwatch-agent/etc/amazon-cloudwatch-agent.toml Configuration validation second phase succeeded Configuration validation succeeded Redirecting to /bin/systemctl stop amazon-cloudwatch-agent.service Redirecting to /bin/systemctl restart amazon-cloudwatch-agent.service [root@ip-172-19-2-113 ~]# |
Để chắc ăn hơn, bạn check thêm log để đảm bảo rằng không có lỗi lầm gì nha :))
tail -100 /var/log/amazon/amazon-cloudwatch-agent/amazon-cloudwatch-agent.log
Đối với các instance khác cũng tương tự, nhưng thay vì Gen config ra thì bạn pull template trước đó đã update trên Parameter Store về lại máy.
P/s: Trên Centos 7 đảm bảo rằng đã cài aws-cli và config thông tin về secrect key nhen. Bạn sử dụng command “aws configure”
| sudo /opt/aws/amazon-cloudwatch-agent/bin/amazon-cloudwatch-agent-ctl -a fetch-config -m ec2 -c ssm:AmazonCloudWatch-linux -s /opt/aws/amazon-cloudwatch-agent/bin/config-downloader –output-dir /opt/aws/amazon-cloudwatch-agent/etc/amazon-cloudwatch-agent.d –download-source ssm:AmazonCloudWatch-linux –mode ec2 –config /opt/aws/amazon-cloudwatch-agent/etc/common-config.toml –multi-config default |
Chờ khoảng 5p, bạn vào lại AWS Console >> Cloudwatch >> Metrics >> Chọn đúng Regions >> quan sát thấy CWAgent là thành công

V. Tạo Alarm và Send đến Slack
Bước này mình bỏ qua không nói đến việc tạo webhook trên Slack nữa, mặc định mọi người biết tạo hết rồi nhen, nếu chưa biết thì tham khảo gút gồ thêm ạ.
Để trigger được và gửi được alarm đến slack, mình cần đến Lambda Function, SNS, một đoạn script nho nhỏ. Bắt đầu thôi nào…

Trên IAM bạn phải tiếp tục tạo một Role cho Lambda execute được code. Role name AWSLambdaBasicExecutionRole
Từ IAM điều hướng đến Lambda >> Create Function >> Chọn Author from scratch >> Điền vào Function name, ví dụ AlertToSlack chẳng hạn.
Runtime >> chọn Python 3.6
Permissions >> Change default execution role >> Use an existing role >> Chọn Role name mình vừa tạo khi nãy >> Create function
Trong Function code, Add đoạn code sau vào, nhớ change lại cái url webhook cho đúng.
| #!/usr/bin/python3.6
import urllib3 import json http = urllib3.PoolManager() def lambda_handler(event, context): url = “https://hooks.slack.com/services/XXXXXXX/YYYYYYYYYY/ZZZZZZZZZZZZZZZZZZZZ” msg = { “channel”: “#staging-server-alerts”, “username”: “AWS_Staging”, “text”: event[‘Records’][0][‘Sns’][‘Message’], “icon_emoji”: “” }
encoded_msg = json.dumps(msg).encode(‘utf-8’) resp = http.request(‘POST’,url, body=encoded_msg) print({ “message”: event[‘Records’][0][‘Sns’][‘Message’], “status_code”: resp.status, “response”: resp.data }) |
Bấm save (Ctrl+S) lại >> click vào Deploy
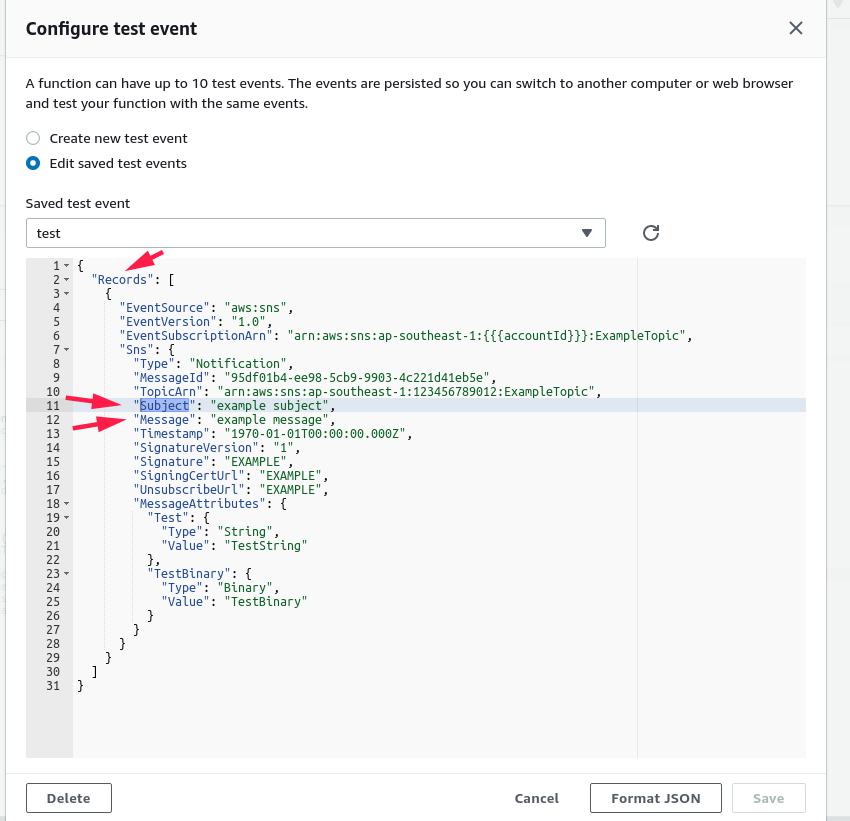
Giờ mình test lại xem function có work chính xác như mong muốn hay không.
Trong cái Bar Test >> configure event >> create new test event >> Amazon SNS topic notification >> bạn nhập tên bất kì, ví dụ như TestFunction >> create
Giờ bạn run Test thử và check lại bên Slack xem nó nhận được notification không?

Tèng Teng, mình nhận được rồi và kết quả test cũng trả về success là đúng nhen.
![]()
Tiếp tục, trên Search tìm SNS (Simple Notification Service), tạo một Topic và tạo một subcrible đến topic đó.
Chọn Topics >> Create Topic >> Chọn Type là Standard >> Nhập vào tên và phần diskplay cho tên
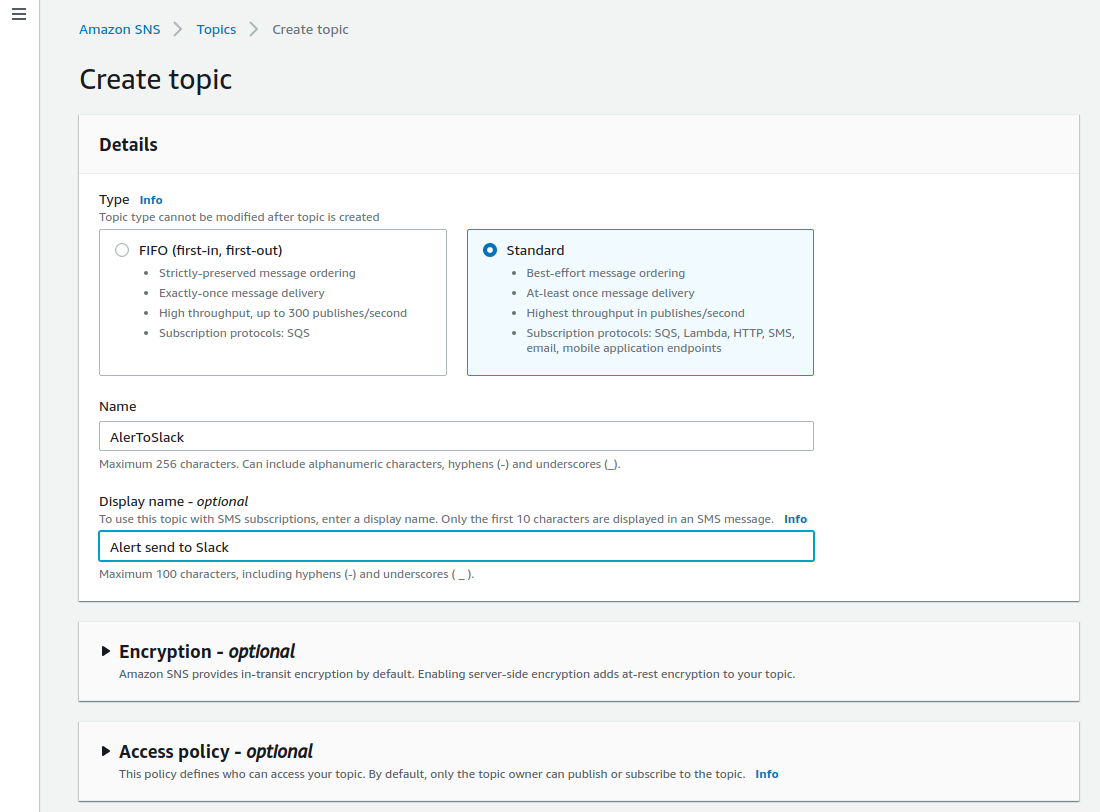
Nhìn bên góc trái >> Chọn Subcriptions >> Create Subcription
Nhập tên bất kì vào phần Topic ARN
Protocol bạn chọn AWS Lambda
Endpoint chọn function name trên Lambda khi nãy mình vừa tạo.
Hoàn tất bằng cách bấm vào Create subcription.

Khi tạo hoàn tất, bạn nhớ để ý phần Status phải là confirmed thì mới success nhé.

VI. Tạo Trigger để alarm
Tới bước này là gần “phá đảo” rồi nha :))
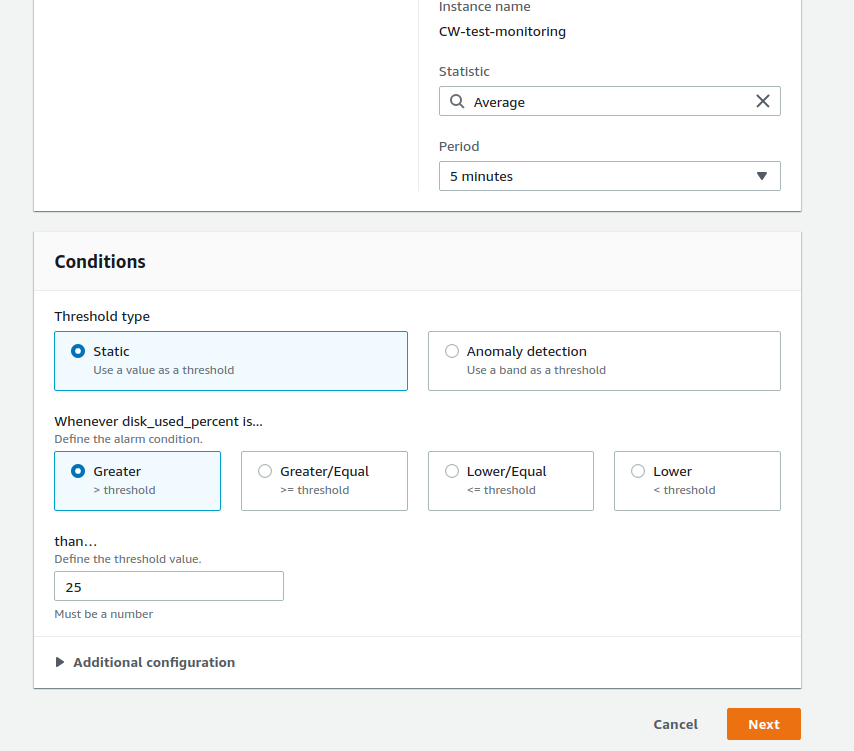
Bạn đi đến Cloudwatch, chọn vào mục Alarms >> Create Alarm
Chọn Select metric >> chọn đến CWAgent >> Chọn lấy metric mình muốn monitor và trigger (giả sử mình muốn monitor Disk Usage chẳng hạn) >> Chọn đến Metric Name disk_used_percent
Conditions Chọn vào Static
Whenever disk_used_percent is… Bạn chọn vào Greater
than… thì bạn chọn con số đến ngưỡng sẽ trigger, ví dụ disk_usage > 25%
Missing data treatment thì chọn Treat missiong data as Ignore (maintain the alarm sate) >> Next
Notification >> In alarm >> Select an existing SNS topic >> Chọn vào topic bạn vừa tạo khi nãy ở SNS.
Nếu muốn một trigger nữa khi trạng thái trở về OK thì Add notification lần nữa và chọn vào OK. >> Next
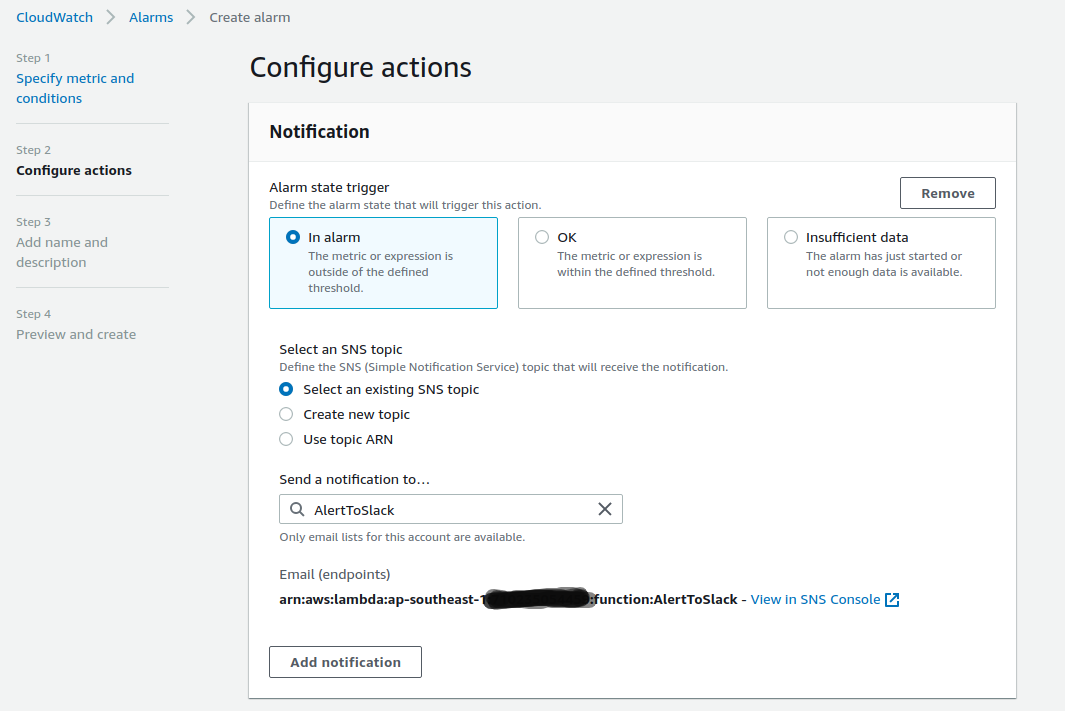
Nhập Tên và phần mô tả ngắn gọn cho alarm >> Next >> Preview lần nữa và tạo mới alarm.
Đây là kết quả khi hoàn tất.

Và đây là alarm khi nhận được:
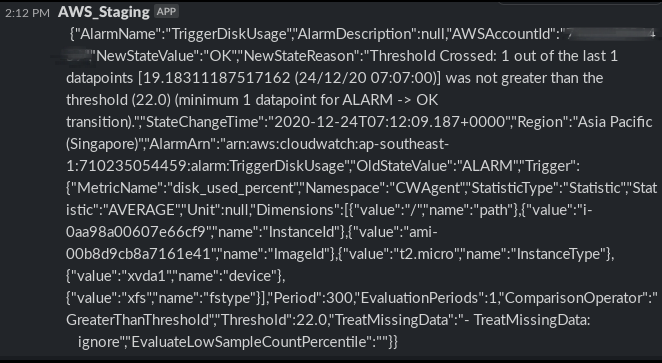
Hơi rối mắt nhỉ, có vẻ cái script python này hơi chuối rồi… Thôi kệ, có còn hơn không, bạn có thể thay bằng một program khác nha, trên google mình thấy có khá nhiều đó, và được viết bằng nhiều program khác nhau như Go, Nodejs …
VII. Tổng kết
Như vậy là bài hướng dẫn Monitor instance sử dụng Cloudwatch xong rồi đấy, hơi dài và hơi rối vì nó kết hợp nhiều service của AWS lại với nhau như là IAM, EC2, Lambda, Cloudwatch, SNS. các bạn nên practice nhiều vào là tự nhiên sẽ quen tay hơn à. Cám ơn các bạn đã theo dõi, xin chào và hẹn gặp lại!
P/s:
Trong bài viết có tham khảo các tài liệu sau:
https://docs.aws.amazon.com/cli/latest/userguide/install-cliv2-linux.html
https://docs.aws.amazon.com/AmazonCloudWatch/latest/monitoring/Install-CloudWatch-Agent.html
Edit: Mình tìm được một cách để nội dung Slack nó không quá dài nữa, đó là thay vì show “Message” thì mình chỉ cần show cái “Subject” là đủ.
Các bạn change lại 2 chổ:
"text": event['Records'][0]['Sns']['Message'], >> "text": event['Records'][0]['Sns']['Subject'],

 "message": event['Records'][0]['Sns']['Message'],  >> "message": event['Records'][0]['Sns']['Subject'],

Happy Changing!!!